DIGITAL
DISPLAY TONNAGE ADJUSTMENT
INSTRUCTIONS
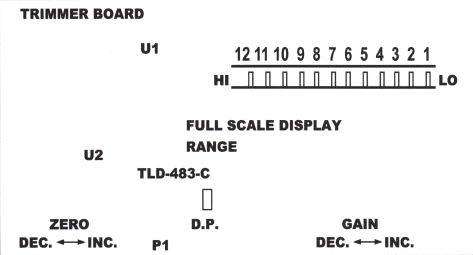
1. Move black programming jumper to the required tonnage position on the Full Scale Display Range Printed Circuit Board on each digital display.
| POSITION #1 | 35 - 217 | POSITION #7 | 433 - 568 |
| POSITION #2 | 106 - 278 | POSITION #8 | 538 - 663 |
| POSITION #3 | 158 - 323 | POSITION #9 | 633 - 748 |
| POSITION #4 | 241 - 397 | POSITION #10 | 730 - 836 |
| POSITION #5 | 309 - 456 | POSITION #11 | 819 - 918 |
| POSITION #6 | 386 - 525 | POSITION #12 | 895 - 969 |

NOTE:
REMOVE DECIMAL POINT D.P. JUMPER FOR PRESS TONNAGE 100 TONS AND OVER
INSTALL DECIMAL POINT D.P. JUMPER FOR PRESS TONNAGE 99 TONS AND UNDER
2. Push Calibrate Button and hold, while adjusting the Gain Pot by increasing (INC.) the tonnage or decreasing (DEC.) the tonnage depending on the tonnage required for each digital display.
3. Recheck the system. Push the Reset Button, recheck Zero Pot adjustment. Recheck Gain adjustment while holding Calibrate Button depressed.
NOTE:
WHEN ADJUSTING GAIN POT, MAKE SURE CONTROL KNOB IS TURNED ALL THE WAY TO THE
RIGHT, SO THE SYSTEMS CONTROL FUNCTION WILL NOT OVERLOAD WHEN ADJUSTING GAIN.